# 迁移 Weex 项目到 CML
# 迁移原则:
以小逻辑块为单位,对照老代码,以 cml 语法重写,报错可修正
这样可避免以下问题:
1、大块逻辑迁移会导致报错无法追查
2、直接 copy 会导致语法隐藏 bug 不可控(虽然 ide 没有问题,但真机调试出问题)
请尽量按照 cml 语法或者类 vue 语法重写迁移,避免语法纠错浪费时间
# 项目初始化
cml init project
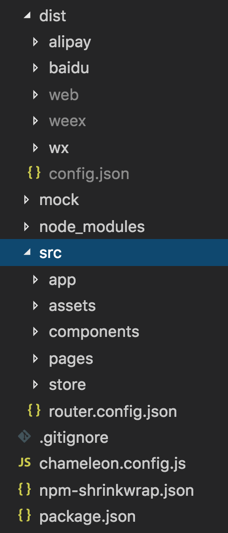
初始化后,CML 项目如下:

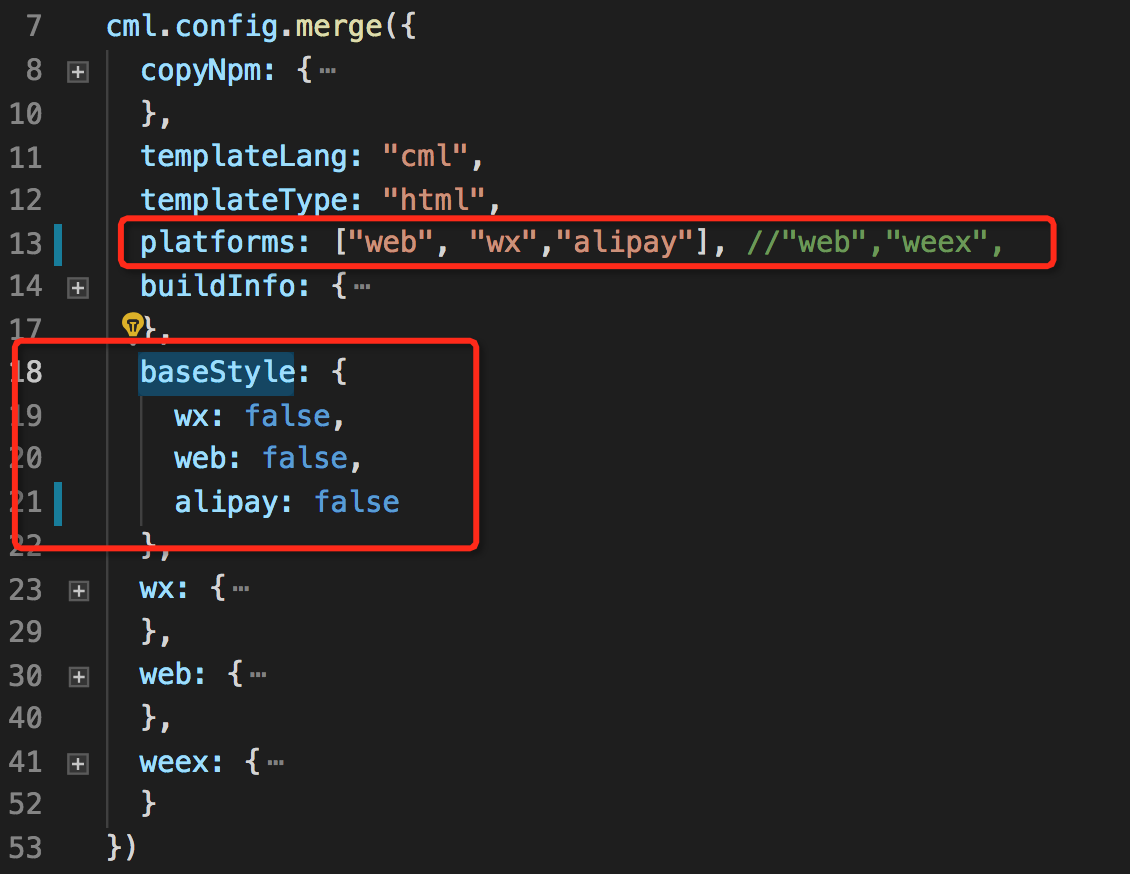
依具体情况配置构建平台和配置平台基础样式。
可修改 chameleon.config.js 的 platforms 和 baseStyle 字段,如下:

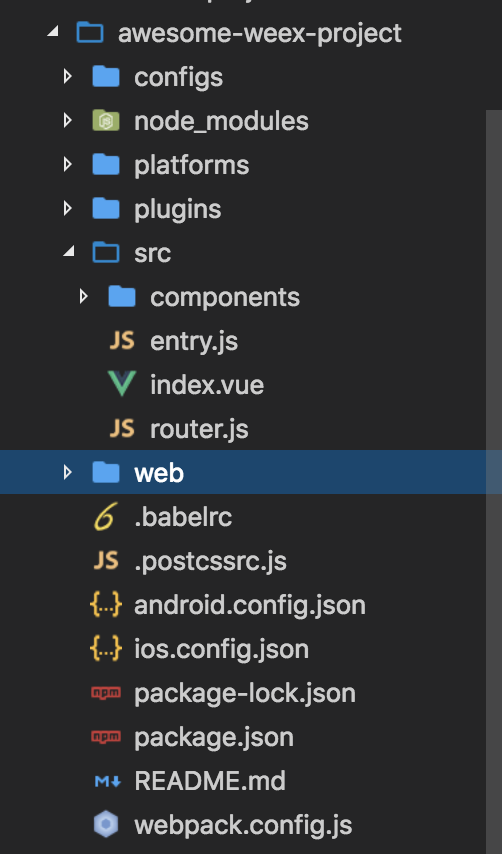
假设有下面 👇 结构的 Weex 项目 weex-toolkit生成。

components下包含各个组件代码,router.js下是路由配置,config是 Weex 项目的 webpack 构建的基本配置
# 工程层面的迁移
# 迁移 —— webpack 配置
CML 的工程配置具体参考
# CML 命令行工具,提供了 dev build 两种构建模式,可以对应到 Weex 项目中的dev build
| Weex 项目 | CML 项目 |
|---|---|
| npm run dev | cml dev |
| npm run build | cml build |
# CML 内置了对于 webpack 和项目的构建,参考这里修改 CML 内置 webpack 构建
# 迁移 —— store
CML 中的 store 使用参考
CML 项目中的 store 和 Weex 项目中的 store 文件下是对应的。
假设 vue 项目中某个组件
import { mapState } from 'vuex';
export default {
  computed: mapState(['count']),
};
那么在 CML 项目中
import store from '../path/to/store';

class Index {
  computed = store.mapState(['count']);
}
export default new Index();
# 迁移 —— router
# router-view出口的对应关系
假如 Weex 项目中入口文件 src/index.vue
<template>
  <div id="app">
    <router-view />
  </div>
</template>
那么对应着 CML 项目中的src/app/app.cml,这里的<app>会渲染成<router-view>对应的某个路由;
<template>
  <app store="{{store}}" router-config="{{routerConfig}}"></app>
</template>
# 路由配置的对应关系
weex项目中的路由 src/router.js
import Vue from 'vue';
import Router from 'vue-router';
import HelloWorld from '@/components/HelloWorld';

Vue.use(Router);

export default new Router({
  routes: [
    {
      path: '/helloworld',
      name: 'HelloWorld',
      component: HelloWorld,
    },
  ],
});
cml项目中 src/router.config.json
{
  "mode": "history",
  "domain": "https://www.chameleon.com",
  "routes":[
    {
      "url": "/helloworld",
      "path": "/pages/HelloWorld/HelloWorld",
      "name": "helloworld",
      "mock": "index.php"
    }
  ]
}
其中:
url字段 对应 vue 中的path字段;
path字段对应 vue 中 import Comp from '/path/to/Comp'中的组件路径
chameleon 会自动引入 component 字段配置的组件,不需要再配置 component 字段;
总结
1 注意 CML 项目中不支持路由嵌套,如果有路由嵌套的情况需要考虑转化成组件去实现
2 在迁移路由的时候,要一个一个路由对应着去迁移
3 vue 项目中的一级路由的组件都通过 cml init page 去初始化这个组件
# 迁移页面/组件
假如 Weex 项目中 src/components/HelloWorld.vue组件内有个子组件 comp;
首先我们修改下这两个组件,使其有一些简单的新增 todolist 的功能
HelloWorld.vue
<template>
  <div class="demo-com">
    <div class="title">this is helloworld</div>
    <comp @parentClick="handleParentClick"></comp>
  </div>
</template>

<script>
import lodash from 'lodash';
import comp from './comp.vue';
export default {
  name: 'HelloWorld',
  data() {
    return {};
  },
  methods: {
    handleParentClick(...args) {
      console.log('parentClick', ...args);
    },
  },
  components: {
    comp,
  },
};
</script>

<!-- Add "scoped" attribute to limit CSS to this component only -->
<style scoped>
.demo-com {
  display: flex;
  flex-direction: column;
  align-items: center;
  height: 400px;
  justify-content: center;
}
.title {
  align-self: center;
  color: #61c7fc;
  font-size: 72px;
  margin-bottom: 20px;
}
</style>
注意:如果第三方仓库中的某些 API 依赖该平台的全局变量,那么这些 API 只能在该平台使用,在其他平台是无效的;
comp.vue
<template>
  <div>
    <input type="text" v-model="todo" />
    <div v-for="(item, index) in todos">
      {{ item }}
    </div>
    <div @click="addTodo">addTodo</div>
    <div @click="handleClick">触发父组件事件</div>
  </div>
</template>

<script>
export default {
  name: 'HelloWorld',
  data() {
    return {
      todo: 'todo1',
      todos: [],
    };
  },
  methods: {
    addTodo() {
      this.todos.push(this.todo);
    },
    handleClick() {
      console.log('click');
      this.$emit('parentClick', {
        value: 1,
      });
    },
  },
};
</script>

<!-- Add "scoped" attribute to limit CSS to this component only -->
<style scoped></style>
# 新建页面/组件
cml init page

输入 HelloWorld
利用命令行命令,在src/pages中生成对应的页面
<template>
  <view><text>HelloCML</text></view>
</template>

<script>
class HelloWorld {
  //...
}

export default new HelloWorld();
</script>

<style></style>

<script cml-type="json">
{
  "base": {
    "usingComponents": {}
  },
  "wx": {
    "navigationBarTitleText": "index",
    "backgroundTextStyle": "dark",
    "backgroundColor": "#E2E2E2"
  },
  "alipay": {
    "defaultTitle": "index",
    "pullRefresh": false,
    "allowsBounceVertical": "YES",
    "titleBarColor": "#ffffff"
  },
  "baidu": {
    "navigationBarBackgroundColor": "#ffffff",
    "navigationBarTextStyle": "white",
    "navigationBarTitleText": "index",
    "backgroundColor": "#ffffff",
    "backgroundTextStyle": "dark",
    "enablePullDownRefresh": false,
    "onReachBottomDistance": 50
  }
}
</script>
cml init component
选择 Normal component
输入 comp
生成的组件如下
<template>
  <view><text>HelloCML</text></view>
</template>

<script>
class Comp {
  //...
}

export default new Comp();
</script>
<style></style>
<script cml-type="json">
{
  "base": {
    "usingComponents": {}
  }
}
</script>
# 迁移组件引用
假设 Weex 项目src/components/HelloWorld.vue中引用了其他组件 import comp from './comp.vue';
对应到 CML 项目 组件需要在 usingComponents 引用,不需要在配置 components字段
修改src/pages/HelloWorld/HelloWorld.cml 页面配置,如下:
<script cml-type="json">
{
  "base": {
    "usingComponents": {
      "comp":"/components/comp/comp"
    }
  }
}
</script>
总结:
1 router.js中对应的组件需要通过 cml init page生成,然后在 router.config.js中配置对应路由
2 组件内部引用的子组件要通过cml init component生成,然后通过 usingComponents字段去引用
3 组件内引用的其他 js 库,比如import lodash from 'lodash'仍然通过import的形式引用
# 页面&&组件迁移细节
# template 模板迁移
这里以 CML 的 Vue 语法为例:CML 类 Vue 基础语法
# 数据绑定、条件渲染、循环、事件绑定的迁移
假设,原有 vue 项目代码,如下:
<div class="scroller-wrap">
  数据绑定
  <div>{{}}</div>
  条件渲染
  <div v-if="condition1">v-if</div>
  <div v-else-if="condition2">v-else-if</div>
  <div v-else>v-else</div>
  循环
  <div v-for="(item ,index) in array"></div>
  事件绑定
  <div id="tapTest" @click="handleClick">Click me!</div>
</div>
那么,使用 CML 的类 Vue 语法后:整体基本上不用变,只需要将标签改成 CML 的内置标签即可。
<view class="scroller-wrap">
  数据绑定
  <view>{{}}</view>
  条件渲染
  <view v-if="condition">v-if</view>
  <view v-else-if="condition1">v-else-if</view>
  <view v-else>v-else</view>
  循环
  <view v-for="(item ,index) in array"></view>
  事件绑定
  <view id="tapTest" @click="handleClick">Click me!</view>
</view>
# CML 对于语法的扩展支持
# 指令的扩展 c-show、c-model、c-show参考
# component is 动态组件的扩展参考
# 事件绑定支持内联事件传参数参考
# Weex 的内置组件迁移
以下表格列出 Weex 的内置组件迁移到 CML 项目中的对应情况,不能在视图层用 Weex 端特有的组件,需要通过以下标签进行替换
除非是通过多态组件调用的下层组件才可以使用。
对于 Weex 内置的组件,CML 提供了大部分与之对应的可以跨端的组件。
| Weex 内置组件 | CML | 备注 |
|---|---|---|
<div> | <view> | 支持跨多端 |
<text> | <text> | 支持跨多端 |
<image> | <image> | 支持跨多端 |
<list> | <list> | 支持跨多端 |
<cell> | <cell> | 支持跨多端 |
<loading> | <c-loading> | 支持跨多端 |
<scroller> | <scroller> | 支持跨多端 |
<slider> | <carousel> | 对于轮播图组件,chameleon 内置了carousel组件,如果想要用原生的slider,需要在多态组件中通过 origin-slider使用 |
<textarea> | <textarea> | 支持跨多端 |
<input> | <input> | 支持跨多端 |
<video> | <video> | 支持跨多端 |
chameleon 不支持的 Weex 内置组件
| Weex 内置组件 | 在 CML 中的替换方式 |
|---|---|
<a> | 可以通过给一个 text 标签绑定事件,通过 chameleon-api 提供的接口打开页面 |
<waterfall> | 该组件不支持跨多端,仅可在多态组件中使用 |
<web> | 该组件不支持跨端,仅可在多态组件中使用 |
<richtext> | 该组件不支持跨端,仅可在多态组件中使用 |
根据以上教程,我们可以迁移HelloWorld.vue和comp.vue中的模板内容了
HelloWorld.cml
<template lang="vue">
  <view>
    <text>this is helloworld</text>
    <comp @parentClick="handleParentClick"></comp>
  </view>
</template>
comp.cml
<template lang='vue'>
  <view>
    <input type="text" v-model="todo" ></input>
    <div v-for="(item,index) in todos">
      {{item}}
    </div>
    <div @click="addTodo">addTodo</div>
    <view @click="handleClick"><text>触发父组件事件</text></view>
  </view>
</template>
# JS 内容迁移
# 生命周期迁移 :和 vue 保持一致
# 数据的迁移参考
# Weex 项目 API 的迁移
API 迁移包括 http 请求 路由跳转 本地存储等 参考:chameleon-api 的文档
# weex 内置模块的迁移
不能在逻辑层用 Weex 端特有的内置模块,需要通过以下chameleon-api提供的进行替换
除非是通过多态组件调用的下层组件才可以直接使用。
| Weex | CML | 备注 |
|---|---|---|
| animation | chameleon-api 中的 createAnimation | 参考 |
| cliboard | chameleon-api 中的 clipBoard | 参考 |
| dom | chameleon-api 中的 getRect | 参考 |
| globalEvent | 暂不支持 | |
| meta | chameleon-api 中的 getSystemInfo | 参考:可以通过这个 API 获取到视口的值然后给页面宽高赋值 |
| modal | chameleon-api 中的 showToast | 参考 |
| navigator | chameleon-api 中的 路由导航 | 参考 |
| picker | 扩展组件中的 c-picker | 参考 |
| storage | chameleon-api 中的数据存储 | 参考 |
| stream | chameleon-api 中的网络请求 | 参考 |
| webview | 暂不支持 | |
| websockets | chameleon-api 中的 websockets | 参考 |
# 事件的触发机制,映射如下:
| vue 项目 | cml |
|---|---|
| this.$emit(xxx,xxx) | this.$cmlEmit(xxx,xxx) |
# 事件对象参数
CML 对 web native wx 各个端的事件对象进行了统一代理参考。
对于灰度区组件(多态组件)各个端的事件对象还是对应端的事件对象,CML 框架不会对灰度区origin-开头的标签和第三方组件标签上绑定的事件进行事件代理
CML 支持的类 Vue 语法,只有在文档中列出的语法才支持多端,其他没有列出的语法仅可以在 Web 端使用,跨端没有支持,比如 v-html class 的对象语法 数组语法等。
# 不支持的事件
longpress appear disappear 事件暂不支持;
# 事件冒泡
chameleon 生成的 Weex 项目默认都是开启了支持事件冒泡的机制
同时扩展了阻止事件冒泡的语法;
vue 语法(仅仅支持 .stop)
<view @click.stop="handleClick"></view>
cml 语法
<view c-catch:click="handleClick"></view>
总结
1 由于 CML 是跨多端的框架,所以在 Weex 端特有的环境变量,比如weex.config等在 CML 中是不支持的
2 对于 Weex 的内置模块,比如 animation 等,在 chameleon-api 中基本上都有对应,参考上文 Weex 内置模块的迁移
根据以上教程,我们可以迁移HelloWorld.vue和comp.vue中的 js 内容了
HelloWorld.cml
<template lang="vue">
  <view>
    <text>this is helloworld</text>
    <comp @parentClick="handleParentClick"></comp>
  </view>
</template>

<script>
import lodash from 'lodash';
class HelloWorld {
  methods = {
    handleParentClick(...args) {
      console.log('parentClick', ...args);
    },
  };
}

export default new HelloWorld();
</script>
comp.cml
<script>
class Comp {
  data = {
    todo: 'todo1',
    todos: [],
  };

  methods = {
    addTodo() {
      this.todos.push(this.todo);
    },
    handleClick() {
      this.$cmlEmit('parentClick', {
        value: 1,
      });
    },
  };
}

export default new Comp();
</script>
# style 内容的迁移
# 页面布局的迁移
使用 flexbox进行样式布局
关于样式的使用教程参考
模板上的样式语法参考
Vue 样式语法规范参考
# 样式单位的迁移
如果样式想要适配多端,需要将单位改成cpx;
根据以上教程,我们可以迁移HelloWorld.vue和comp.vue中的 js 内容了
HelloWorld.cml
.demo-com { display: flex; flex-direction: column; align-items: center; height:400cpx;
justify-content: center; } .title { align-self: center; color: #61c7fc; font-size: 72cpx;
margin-bottom: 20cpx; }
#
以上,简单的介绍了 Weex 项目迁移到 CML 的步骤,如果还有任何疑问,欢迎随时在 CML 官方微信和官方 QQ 群里进行反馈,我们将随时解答你的困惑,再次感谢你对 CML 的支持~
Best wishes
CML 团队
